You bought the URL. Now you need the inbox.
To create email with domain ownership is the single most critical infrastructure decision you will make for your business. It is the difference between a hobbyist using gmail.com and a verified entity operating as name@company.com.
But setting this up isn’t just about looking professional. It’s about control. When you rely on free ISP mail or generic Gmail, you are a tenant. When you own the domain and the MX records, you are the landlord. You control the data, the costs, and the security posture.
Whether you are a founder provisioning your first mailbox or an MSP migrating fifty clients away from a legacy cPanel host, the mechanics are identical. You need a domain, a host, and a precise set of DNS records.
This is not a fluff piece. This is the technical runbook for setting up professional email infrastructure that actually delivers.
Before you start (2 minutes): what you need
Attempting to configure email without these three components ready is a recipe for “split-brain” DNS and lost messages. Do not start until you have:
- The Domain Name: You must own the URL (e.g., yourcompany.com). If you haven’t bought one, registrars like Namecheap, Cloudflare, or Porkbun are reliable. Avoid buying domains from your web host if possible; keeping your registrar and hosting separate is a basic safety principle.
- DNS Access: You need the “keys to the kingdom.” You must be able to edit TXT, MX, and CNAME records. This is usually found in your registrar’s dashboard under “DNS Management,” “Zone Editor,” or “Advanced DNS.”
- The Email Host: The registrar points the traffic; the host stores the data. You cannot simply “turn on” email at GoDaddy or Namecheap without a hosting plan.
- The Default Choice: Google Workspace or Microsoft 365. Powerful, but expensive (72–144/user/year) and complex to manage.
- The Logical Choice: TrekMail. We built this for operators who need professional email without the “per-seat tax” or the bloat of enterprise suites.
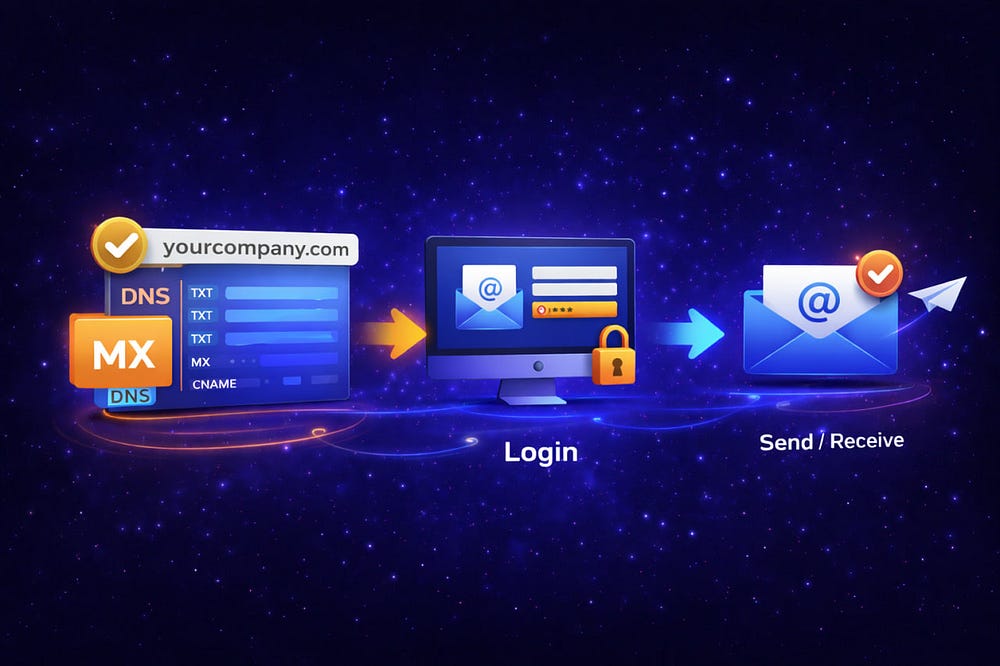
The 10-minute checklist (DNS → mailboxes → login → send/receive)
If you’ve done this before, here is the “fast path” to create email with domain functionality. If you miss one of these, you will likely encounter delivery errors.
Step-by-step setup
This section details the exact mechanics to create business email address infrastructure. We will assume you have your registrar open in one tab and your TrekMail (or other host) dashboard in another.
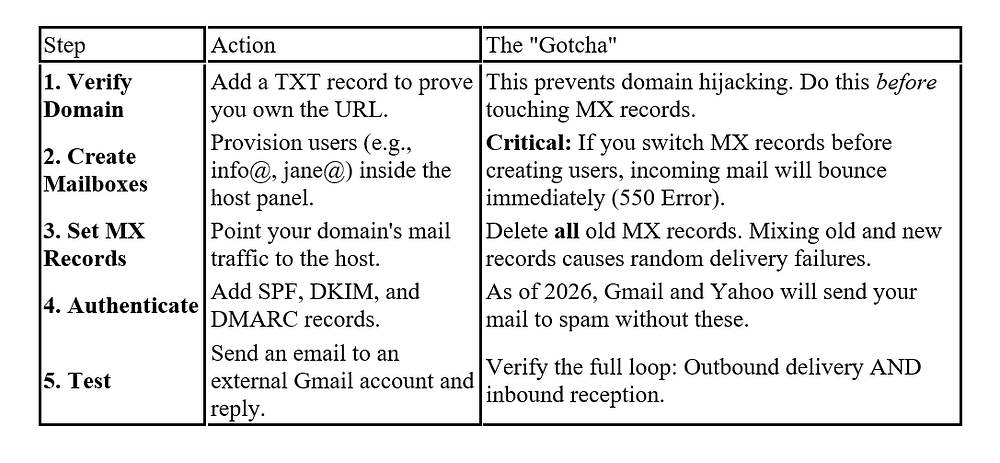
Create mailboxes (The “User Not Found” Trap)
The most common mistake beginners make is changing the MX records first.
Do not do this.
When you change MX records, the internet immediately starts trying to deliver mail to the new server. If that server doesn’t know that contact@yourdomain.com exists, it rejects the message with a “550 User Not Found” error. The sender gets a bounce back, and you lose the lead.
The Procedure:
- Log into your TrekMail dashboard.
- Navigate to the Mailboxes tab.
- Create every single address you currently use.
- SMBs: Create your personal address (yourname@) and your functional address (hello@).
- Agencies: If migrating a client, you must replicate their exact list of aliases. If they used billing@ on the old host, you must create billing@ on the new host before the switch.
Set MX records (The Cutover)
MX (Mail Exchange) records are the traffic controllers. They tell the world, “Send email for this domain to this server.” To set up email for domain routing:
- Go to your Registrar’s DNS Management page.
- Purge: Delete any existing MX records. You might see records for “GoDaddy Secure Mail” or “Google.” Kill them. You want a clean slate.
- Add: Input the records provided by your host. Example:
- Type: MX
- Host/Name: @ (or leave blank, depending on the registrar)
- Value: mx1.trekmail.net (Priority 10)
- Value: mx2.trekmail.net (Priority 20)
Note on TTL (Time To Live): If you can edit the TTL, set it to 300 seconds (5 minutes). This tells the internet to check for changes frequently, speeding up the propagation process.
First login + test send/receive
Once the DNS propagates (usually 15 minutes, but can take up to 24 hours), log in via webmail. Do not waste time configuring Outlook or iPhone Mail yet. We need to verify the server connection first.
- The Outbound Test: Compose an email to your personal Gmail.
- Check: Did it arrive? Did it land in Spam? (If it’s in Spam, your SPF/DKIM is missing — see below).
2. The Inbound Test: Reply from Gmail to your new business address.
- Check: Did it arrive in the webmail inbox?
- Success: If yes, the MX records are valid. You are live.
For a detailed walkthrough on specific registrars, see our documentation: https://trekmail.net/docs/domains-dns
Business email address vs personal
Why bother? Why not just use mycompany@gmail.com?
Aside from looking like a temporary operation, using a personal address for business introduces massive operational risk.
- Data Ownership: If you use a free Gmail account for business and Google locks you out (which happens via automated AI flagging), you lose your client list, your invoices, and your history. There is no support number to call. When you create email with domain ownership, you own the data. If you hate your host, you export your mail and move.
- The “Bus Factor”: If your sales rep uses john.sales@gmail.com and quits, he takes your leads with him. If he uses john@yourcompany.com, you reset his password and redirect his mail to the new hire.
- SaaS Lock-out: If you sign up for your accounting software or CRM with a personal email, and that employee leaves, you often cannot recover the account. Always use a controlled domain email (billing@yourcompany.com) for infrastructure accounts.
Custom domain email address explained
A custom domain email address is simply an email identity where the suffix matches your website. But under the hood, it represents a shift in liability.
- ISP Mail (Old): user@comcast.net. You are tied to your internet provider. If you move houses, you lose your email.
- Web Host Mail (Bad): Email hosted on the same cPanel server as your WordPress site. If your website gets DDoS’d or hacked, your email goes down with it. This is a “Single Point of Failure.”
- Dedicated Email Hosting (Best): Your email lives on specialized infrastructure (like TrekMail, M365, or Google). It is decoupled from your website. If your website crashes, you can still email support to fix it.
Simplest setup for 1–5 mailboxes
For the vast majority of small businesses, the “standard” advice to buy Microsoft 365 or Google Workspace is overkill. You are buying a Ferrari to drive to the grocery store.
The Old Way (The Suite Trap):
You sign up for Google Workspace.
- Cost: $6/user/month (Starter).
- The Catch: You have 3 employees, but you also need info@, sales@, and billing@. Google often pushes you to pay for these as separate users. Suddenly, you’re paying 36/month or 432/year) just to have basic email routing.
- Storage: The “Starter” plan has a 30GB limit per user. If one user hits that limit, their email stops. You can’t “borrow” space from the other users. You have to upgrade everyone to the next tier ($12/user/month).
The New Way (TrekMail Pooled Model):
We designed TrekMail to solve the “Per-User Tax.”

- Cost: Flat rate (e.g., Starter Plan).
- The Benefit: You get a pool of storage (e.g., 15GB or 50GB) shared across the domain. You can create 5, 10, or 50 mailboxes. As long as the total storage fits, you don’t pay extra.
- Simplicity: No “admin console” with 500 settings. Just a dashboard to add users and check mail.
This approach allows you to create email with domain capabilities that scale with your actual usage, not your headcount.
MX records explained for non-engineers
DNS is abstract, so let’s use a concrete analogy.
Think of your domain (yourcompany.com) as a commercial building.
- The A Record is the front door for customers (your website).
- The MX Record is the loading dock for deliveries (your email).
When someone sends you an email, their server looks up your domain in the phonebook (DNS). It specifically looks for the “MX” entry.
- If the MX record is missing, the server drives around the block and eventually returns the package (Bounce).
- If the MX record points to the wrong place (e.g., your old host), the package is delivered to an empty warehouse where nobody signs for it.
You can have a working website (A Record) and broken email (MX Record) simultaneously. They are independent systems.
Common DNS mistakes
We see the same five errors destroy deliverability every day. When you domain email setup fails, check these first:
- The “Backup MX” Trap: Some old guides tell you to keep your old host’s MX records as a “backup” with a lower priority. Do not do this. Spammers target low-priority MX records because they often have weaker security filtering. If you leave old records, you are opening a back door for spam.
- CNAME Flattening: You generally cannot put a CNAME record on your root domain (@). If you try to CNAME your root domain to a website builder (like Wix or Squarespace), it often breaks the MX records entirely. You must use an “A Record” or a specialized “Alias/Aname” record for the root.
- Propagation Patience: DNS is distributed. Just because it works on your phone doesn’t mean it works on your laptop yet. Changes can take 24 hours. If you change records, wait. Changing them again 10 minutes later resets the clock.
- Missing SPF: If you send email without an SPF record, you look like a counterfeiter. Google will put you in the spam folder.
- Typo in the Hostname: When setting up MX records, the “Host” should usually be @ (representing the domain itself). If you type mail or www, you are setting up email for user@mail.yourcompany.com, which is not what you want.
Which addresses to create first + ownership
When you set up domain email address infrastructure, think about the lifecycle of the account.
1. The “Break-Glass” Admin (ops@ or admin@)
- Why: Never make your personal email (john@) the Super Admin. If you get locked out, or if you sell the company, untangling a personal account from the admin rights is a nightmare.
- Rule: Create a dedicated admin account. Store the password in a safe. Use it only for configuration.
2. The Functional Aliases (info@, support@)
- Why: You don’t want to log into five different inboxes.
- Setup: In TrekMail, create info@ as an Alias that forwards to john@. This costs nothing and keeps your workflow centralized. You can still “Send As” info@ from your main inbox.
3. The Role Accounts (billing@)
- Why: Use this for all SaaS invoices (AWS, Hosting, CRM).
- Scenario: You fire your marketing manager. If the Facebook Ads account was tied to sarah@, you’re in trouble. If it was tied to marketing@, you just change the password.
Naming conventions & examples
Decide on a format now, before you have 20 employees. Changing email formats later breaks address books and confuses clients.
- First Name (john@):
- Pros: Friendly, startup vibe. Easy to remember.
- Cons: Fails immediately when you hire a second John.
- First Initial + Last Name (jdoe@):
- Pros: The corporate standard. Highly unique.
- Cons: Can be hard to say over the phone (“J as in Juliet…”).
- First Name + Last Initial (johnd@):
- Pros: A good middle ground.
- Cons: Still risks collision (John Davis vs John Doe).
- Full Name (john.doe@):
- Pros: Professional, clear, zero ambiguity.
- Cons: Long to type. High risk of typos.
Recommendation: Start with firstname@ if you are small. Be prepared to migrate to first.last@ as you grow. TrekMail allows you to keep the old address as an alias so you never miss mail.
Advanced: The “Deliverability Trinity”
In 2026, setting up MX records is not enough. You must prove you are not a spammer. There are three DNS records required to hit the Inbox.
- SPF (Sender Policy Framework): A list of IP addresses allowed to send mail for you.
- The Record: v=spf1 include:_spf.trekmail.net -all
- Translation: “Only TrekMail can send for me. Reject everyone else.”
2. DKIM (DomainKeys Identified Mail): A digital signature attached to every email. It proves the email wasn’t tampered with in transit.
- The Setup: You generate a key in the TrekMail dashboard and add it as a TXT record in your DNS.
3. DMARC (Domain-based Message Authentication, Reporting, and Conformance): The policy engine. It tells Gmail what to do if SPF or DKIM fails.
- The Record: v=DMARC1; p=none; rua=mailto:dmarc@yourdomain.com
- Translation: “If authentication fails, tell me about it (via the rua email), but don’t block it yet.” Once you are confident, switch p=none to p=reject.
Troubleshooting: When it breaks
You followed the steps, but it’s not working. Here is the diagnostic checklist.
“I can send, but I can’t receive.”
- Cause: MX records are wrong or haven’t propagated.
- Fix: Use a tool like whatsmydns.net to check your MX records globally. If they still show your old host, wait. If they show nothing, check your registrar settings.
“I can receive, but my emails go to Spam.”
- Cause: Missing SPF or DKIM.
- Fix: Check your headers. Send an email to mail-tester.com. It will give you a score and tell you exactly which record is missing.
“Outlook keeps asking for my password.”
- Cause: Legacy Authentication vs. Modern Auth.
- Fix: Ensure you are using the correct ports.
- IMAP (Incoming): Port 993 (SSL/TLS)
- SMTP (Outgoing): Port 465 (SSL/TLS) or 587 (STARTTLS)
- Username: Your full email address, not just the part before the @.
For detailed client configuration, refer to our guide: https://trekmail.net/docs/webmail-clients/imap-smtp-settings
Final thoughts
To create email with domain infrastructure is to take responsibility for your digital presence. It moves you away from the whims of free providers and the rigid pricing of enterprise suites.
The goal is a “set and forget” system. By configuring your DNS correctly the first time — cleaning up old records, setting up the Deliverability Trinity, and choosing a host that aligns with your business model — you build an asset that requires zero maintenance.
If you are tired of per-user pricing and want a platform built for operators, TrekMail is the logical next step. But regardless of where you host, own your domain, own your records, and own your data.
Comments
Post a Comment